How to design an asymmetrical gallery wall that actually looks good

There’s something about asymmetrical gallery walls that are just…cool. Many people have at least one gallery adorning their home, whether it’s made of artwork, souvenirs, family photos, or even mirrors. It’s a great way to add style, individuality, and character, while thankfully filling up large amounts of blank wall space in the process.
The laid-back vibes of an asymmetrical gallery lead us to think we can pick up any sort of frames we have laying in the basement, match them with our favorite photos, and throw them up on the wall casually, without too much thought. But the truth is, asymmetrical galleries are surprisingly tricky to pull off well! When we don’t pay attention to aesthetic ‘rules’ and miss out on creating patterns in our gallery, the result can be unsatisfying, incomplete, and well, ‘blah’.
If you’re a first-timer, or you’ve tried an asymmetrical gallery a few times already and feel frustrated with the result, read through the following 3 steps to creating an asymmetrical gallery of your dreams!

Selection:
Build a family with your photos and frames
Just like a healthy family, the pieces of your gallery wall should all have common threads that bond each other together, while allowing space for each to be their own unique self. To do this, imagine that all your pieces were getting together for a family reunion or a holiday gathering.
Do they look like they’re all at the same party? Do they ‘get along’ with each other? Look at the colors, styles, materials, or subjects. Does every piece have at least one relative in many (maybe not all) of these categories? A sign of a truly incredible selection for your gallery wall is one in which pieces shuffle together and apart in different categories. For instance, you might connect with your cousins on sports, but separately, you share a love of mystery novels with your uncle. It’s both exciting and pleasing to us when we notice patterns, and the best gallery walls make pattern recognition like a game to us.
To better explain what I mean, take my office gallery wall for example:

Colors: all 7 pieces include black, 6 have white (7 if you count the light wood in the Minnesota cutout as close enough), and 5 have orange and blue. The 2 pieces that don’t have orange and blue are similar in that they’re basically just black and white.
Styles: For the most part, all the pieces feel simple and straightforward. Modern, without flair or ornate detail.
Materials: 5 are framed in a simple black, and the other 2 are made of wood. Further, 4 pieces are watercolor paintings, 2 are geographic cutouts, and the last is painted acrylic (different but in a way similar enough to the other paintings).
Subjects: 4 pieces are of (foreign) landscapes, 2 are geographic (local), and the remaining of (foreign) people and geometric patterns (the lines and shapes may be a weak connection to the lines and shapes highlighted in the geographic pieces)
Size:
2. Size appropriately for your wall
It probably sounds intuitive, but you may be forgetting that bigger walls are appropriate for bigger frames. So size up! If you have a large blank space to fill, make sure you’re not trying to fill it up with a bunch of 5x7 photos. Every space and every gallery wall is different, but try to push the envelope with bigger frames. Try 11” x 14”, 18” x 24” or even 20” x 36” of something you really love. It may feel more expensive to go big, but the space it fills and the satisfaction of a well-designed gallery wall more than makes up for the difference in price. If you already have a painting or piece of art that you’d like to size up, frame it with matting to widen the overall space it uses for your gallery wall.

Just like with the selection section above, it’s great to have multiple sizes, with pairs or trios of the same size for your arrangement. Keep in mind that the bigger pieces will serve as focal points, so be sure you like it enough to see it more clearly than the others. One way to tell if your gallery wall needs to be sized up is to lay them out, step back, and take it in all at once. Do they all “speak” at the same volume? Does your eye settle on one or two items, or do you wander around looking at the mesh of photos indiscernibly? If there’s no clear winner, if there’s no sense of hierarchy, then widen the range of sizes in your selection (btw, there are other ways to create a focal point in your gallery wall, but size is perhaps the most straightforward way to do this).
Layout:
3. Walk the line
While the layout of asymmetrical gallery walls may look carefree and without rules, the best ones have quite an order to them and are more complicated than they seem! Often, people will pay attention solely to keeping a similar-sized gap between frames on their wall, creating a sort of cloud-like gallery. While this is okayyy, it’s not going to give you that oomph and design-y like satisfaction.
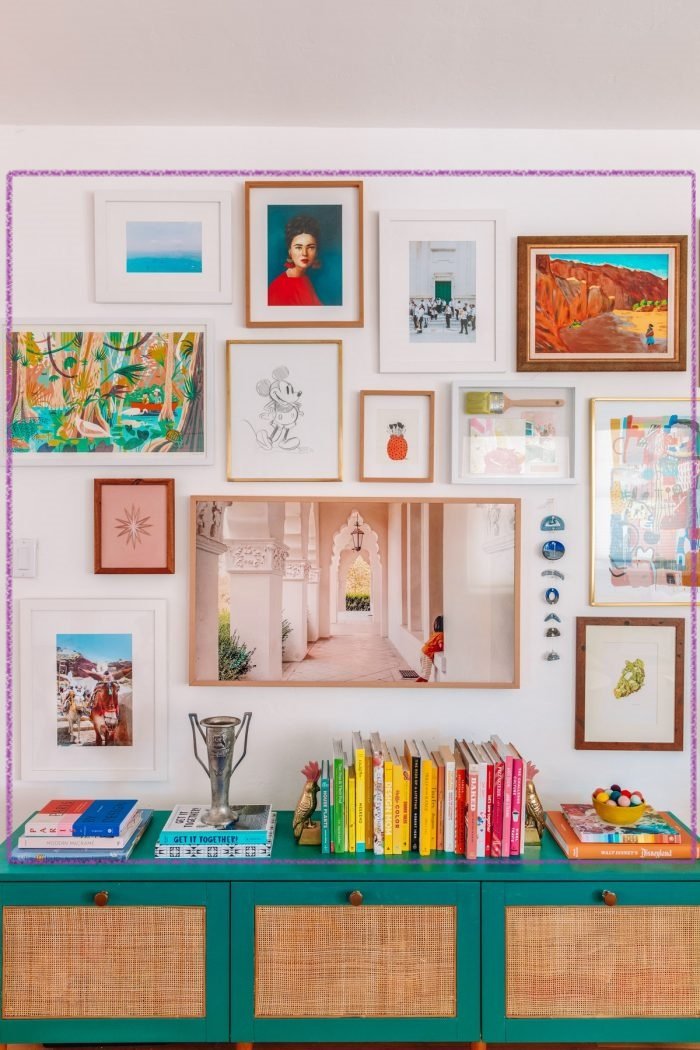
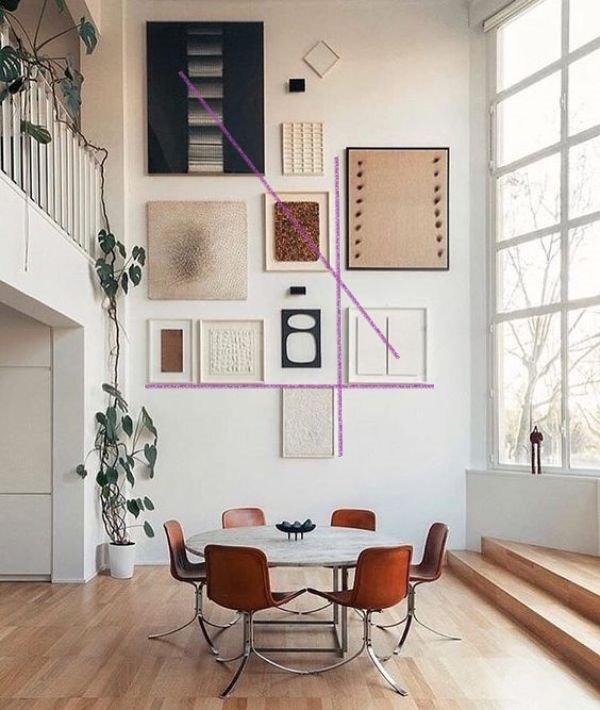
Great gallery walls adhere to “invisible” lines. Lines are created when, for instance, the end of a frame is placed side by side with the end of another. To put this simply into action, imagine a horizontal line in the center of your open wall and place your pieces both above and below it without crossing (see purple line in #1 below), unless you do (#2 and #3) and balance out the space above and below. Another option is to outline a rectangle on your wall and fill the space in the middle precisely, lining up your outside pieces with the outline of the shape (#4+). Straight lines are additionally lovely when they lead up to the middle(ish) of a focal point piece, leading our eyes to it. Once you get comfortable with using a single straight line, go bigger and create several horizontal and vertical lines.


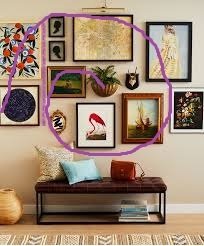
Invisible lines can also be spiraling, starting with a focal piece in the middle and circling outward with your other frames.

Thirdly, invisible lines can be diagonal. We see this most often on staircases, but it looks great in tall and narrow spaces as well. You’ve probably picked up by now that excellent gallery walls use multiple lines, and sometimes more than one type. Now that you know how to look for them, these lines aren’t really ‘invisible’ at all! Do you see some in these examples that I haven’t pointed out?

It’s funny, but true, that when it comes to creativity, there’s actually so much more order and intention involved than meets the eye. Hopefully with this post, you now have all the tools you need to create a well-designed asymmetrical gallery wall. And as you become more comfortable with the ‘rules’, you can start to bend, stretch, and break them intentionally to build a truly magnificent piece of art.